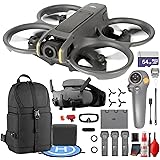
With an estimated 1.1 million recreational drones registered in the United States alone, the skies are becoming increasingly accessible for enthusiasts and professionals alike. Yet, for many new pilots, the sheer complexity of a drone controller can feel like piloting a small aircraft. Understanding the fundamental controls is not just about getting airborne; it’s about confident, safe, and ultimately, more enjoyable how to fly a drone.
The video above provides an excellent primer on the basic joystick functions, but truly mastering your drone demands a deeper dive into each control and how they interact. This guide will expand on those essential concepts, providing you with the knowledge to move beyond mere flight and into truly commanding your aerial craft.
Understanding Your Drone Controller: The Core of Flight
Your drone’s controller is the command center, typically featuring two primary joysticks. While configurations can vary, the “Mode 2” setup is the industry standard, widely adopted by manufacturers like DJI, as highlighted in the video. This configuration dictates how your left and right joysticks translate into drone movements, establishing a universal language for drone pilots.
The Left Joystick: Altitude and Yaw Control
The left joystick is often your first point of contact with true drone control. It governs two crucial axes of movement:
- Vertical Movement (Throttle): Push the left joystick up, and your drone ascends, gaining altitude. Pull it down, and your drone descends, gracefully lowering towards the ground. Think of this as your drone’s elevator. Mastering smooth, consistent throttle input is essential for stable takeoffs and landings, as well as maintaining a steady height during flight.
- Rotational Movement (Yaw): Pushing the left joystick left or right causes your drone to rotate on its vertical axis. This movement is called “yaw.” Imagine the drone pivoting like a spinning top, changing its forward-facing direction without moving horizontally. This control is vital for reorienting the camera, setting up panning shots, or simply navigating tight spaces. For instance, if you want to keep a subject in the center of your frame while orbiting, you’ll constantly be making subtle yaw adjustments.
In essence, the left joystick keeps your drone tethered to a single horizontal point in space, allowing it to move up, down, and spin around its central axis. This control is foundational for precise positioning and orienting your drone for specific shots.
The Right Joystick: Translational Movement
Where the left joystick focuses on vertical and rotational movement, the right joystick is all about horizontal translation. This is how you move your drone through space in a linear fashion:
- Forward/Backward (Pitch): Pushing the right joystick forward tilts the drone’s nose down, causing it to fly forward. Pulling it back tilts the nose up, sending the drone backward. This “pitch” control is your primary means of linear propulsion, allowing you to cover ground efficiently and set up dynamic tracking shots.
- Left/Right (Roll): Pushing the right joystick left tilts the drone to its left, causing it to strafe (move sideways) to the left. Conversely, pushing it right makes the drone strafe right. This “roll” control is indispensable for side-to-side movements, which are often used in conjunction with yaw for smooth orbital shots or to adjust framing subtly.
Combined, the right joystick allows your drone to move freely across a horizontal plane, independent of its rotation. Understanding this distinction from the left joystick is critical for developing intuitive control and achieving complex flight paths.
The real magic of how to fly a drone, particularly for capturing stunning aerial footage, lies in the seamless coordination of both joysticks. For example, to execute a smooth curve around a subject, you might simultaneously apply forward pitch (right joystick), adjust yaw (left joystick) to keep the camera pointed, and subtly roll (right joystick) to maintain your arc. It’s a dance of the thumbs that, with practice, becomes second nature.
Beyond Basic Movement: Mastering the Gimbal
While the joysticks control the drone’s flight, the gimbal is your camera’s dedicated stabilizer and director. It’s the component that holds your camera, isolating it from the drone’s movements to deliver buttery-smooth footage, even in windy conditions. The video briefly mentions the gimbal control, typically a jog wheel on the controller, often found in the upper left-hand corner on DJI models.
Precision Control for Cinematic Shots
The jog wheel usually controls the gimbal’s pitch, allowing you to tilt the camera up and down. Depending on your drone model, you might be able to pitch the camera from looking straight ahead (0 degrees) to directly down (-90 degrees), and some newer models even allow for slight upward angles beyond horizontal. This range of motion is paramount for:
- Composition: Adjusting the camera angle to frame your subject perfectly, whether it’s a sweeping landscape or a detailed close-up.
- Reveals: Starting with the camera pointed down and slowly pitching it up to reveal a stunning vista is a classic cinematic technique.
- Tracking Shots: Keeping the camera locked onto a moving subject while the drone itself flies in a complex path.
The speed at which the gimbal pitches can usually be adjusted in your drone’s settings. A slower gimbal speed lends itself to more deliberate, cinematic movements, adding a professional touch to your footage. Conversely, a faster speed might be useful for quickly reorienting the camera in dynamic situations, although it often results in less polished video.
Essential Drone Controller Features for Every Pilot
Beyond the primary joysticks and gimbal control, modern drone controllers are packed with intelligent features designed to enhance safety, flexibility, and the overall piloting experience. Understanding these additional buttons and settings is crucial for confident and versatile how to fly a drone operations.
Flight Modes and Speed Settings
Many drones offer various flight modes that significantly alter the drone’s responsiveness and maximum speed. The video touches on speed settings (slow, normal, fast), which often correspond to these modes:
- Cine/Tripod Mode: This mode dramatically slows down all drone movements and controls. It’s ideal for beginners learning the ropes, or for capturing incredibly smooth, slow, and precise cinematic shots, especially in tight spaces. The reduced responsiveness minimizes jerky movements, making it easier to achieve professional-looking footage.
- Normal Mode: This is your everyday flying mode, offering a balanced mix of responsiveness and stability. Most pilots will spend the majority of their time in this mode, as it provides enough speed for general flight while still maintaining good control.
- Sport Mode: Also known as “S” mode on DJI drones, this unleashes the drone’s full speed and agility. Controls become highly responsive, and the drone can reach its maximum flight velocity. This mode is excellent for quickly covering large distances or performing dynamic, fast-paced maneuvers. However, it significantly reduces obstacle avoidance effectiveness (if present) and requires a high degree of piloting skill.
Always start in Cine or Normal mode, especially when you’re still learning how to fly a drone. As your confidence and skill grow, you can gradually experiment with Sport mode for more thrilling flights.
The Return-to-Home (RTH) Function
The Return-to-Home (RTH) button is a safety net every drone pilot appreciates. As mentioned, a single press initiates an automated sequence where the drone flies back to its recorded take-off point using GPS. This feature is invaluable in situations like:
- Lost Visual Contact: If you lose sight of your drone.
- Low Battery: Many drones will automatically initiate RTH when the battery reaches a critical level.
- Loss of Signal: If the connection between your controller and drone is lost, RTH often triggers automatically after a preset delay.
Crucially, you must set your RTH altitude correctly. If you’re flying in an area with tall trees, buildings, or other obstacles, ensure the RTH altitude is set higher than the tallest obstruction between the drone’s current position and its home point. Failure to do so can lead to an accidental collision. Conversely, in an open field, a lower RTH altitude conserves battery. Always verify and adjust this setting before each flight in your drone’s companion app.
Programmable Function (Fn) Buttons
Many controllers, especially those from DJI, include one or more programmable function (Fn) buttons. These buttons can be customized within the drone’s app to perform various shortcuts, making your flight experience more efficient. The presenter highlights setting a function button to snap the gimbal to 0 or -90 degrees, which is incredibly useful for:
- Quick Orientation: Instantly bringing the camera to a forward-facing view to assess the flight path or to an overhead view for inspection.
- Efficiency: Eliminating the need to slowly adjust the gimbal with the jog wheel, especially if you have a slow gimbal speed set for cinematic shots.
Other common functions assigned to these buttons include toggling focus peaking, adjusting exposure settings, or even activating specific intelligent flight modes. Customizing these buttons to your workflow can significantly streamline your operations when how to fly a drone.
Preparing for Takeoff: A Comprehensive Pre-Flight Checklist
Before any drone flight, a thorough pre-flight checklist is not just good practice; it’s a critical safety measure. Neglecting these steps can lead to anything from a missed shot to a costly crash. Building on the video’s emphasis on practice, ensuring you’re ready before liftoff is paramount.
- Drone Battery: Is it fully charged and securely inserted? Are the battery contacts clean?
- Controller Battery: Is your remote controller fully charged? Nothing worse than a dead controller mid-flight.
- Propellers: Inspect each propeller for cracks, chips, or bends. Ensure they are securely attached and correctly oriented (A/B markings). Even minor damage can cause instability or failure.
- Gimbal Protector: Is the gimbal protector removed? Forgetting this can damage the gimbal motors.
- SD Card: Is an SD card inserted in the drone? Is it formatted and have enough free space?
- GPS Signal: Wait for a strong GPS signal lock (typically 10-12 satellites) before taking off. This is crucial for accurate RTH and stable positioning.
- Compass Calibration: Calibrate your compass if prompted by the app or if you’ve traveled a significant distance from your last flight location.
- Firmware: Check for any pending firmware updates for both the drone and controller. Outdated firmware can lead to unexpected issues.
- Weather Conditions: Check wind speed and direction, temperature, and precipitation forecasts. Avoid flying in strong winds, rain, or extreme temperatures.
- Airspace Restrictions: Use a reputable app (e.g., B4UFLY, AirMap) to check for any temporary flight restrictions (TFRs) or controlled airspace. Always fly legally and responsibly.
- Obstacle Scan: Visually scan your immediate takeoff and landing area for any potential hazards: power lines, trees, people, animals, or water.
This checklist, performed diligently before every flight, will set you up for success and significantly reduce the likelihood of incidents.
The Foundation of Skill: Practical Drone Flight Exercises
As the presenter wisely advises, “practice is key.” Taking your drone to a large, open field, free from obstacles, is the absolute best way to learn how to fly a drone. The presenter’s anecdote about hitting a palm tree on his Phantom 2 due to insufficient practice in an open area underscores this point vividly. Here are some structured drills to help you build muscle memory and spatial awareness:
- The Stationary Hover: Take off, ascend to about 10-15 feet, and simply try to maintain a perfectly still hover for 30-60 seconds. Focus on making tiny, precise adjustments to keep the drone in one spot. This builds a foundational understanding of how subtle joystick inputs affect stability.
- Vertical Ascent and Descent: Practice smooth, controlled ascents and descents without drifting horizontally. Use only the left joystick, focusing on a consistent rate of climb and descent. Aim for perfect vertical lines.
- Yaw Rotation: While hovering, practice rotating the drone 90, 180, and 360 degrees in both directions (left joystick, left/right). Try to keep the drone centered as it rotates.
- The Box Movement: Fly your drone in a perfect square. Start by flying forward, then strafe right, then fly backward, then strafe left, returning to your starting point. Focus on straight lines and sharp, controlled corners. Repeat in the opposite direction.
- The Figure Eight: This drill combines forward, backward, and strafing movements with yaw control. Practice flying in a smooth figure-eight pattern, ensuring your lines are curved and consistent.
- Orbiting a Point: Choose a stationary object (like a cone or a small tree). Practice flying a perfect circle around it, keeping the camera pointed at the object using precise yaw and strafing adjustments. This is an advanced drill that hones your multi-axis coordination.
- Forward Flight with Gimbal Tilt: Fly forward while slowly tilting the gimbal down, then up. This teaches you to separate flight control from camera control, a crucial skill for cinematic shots.
Dedicate consistent time to these drills. Repetition in a safe environment will build the confidence and reflexes necessary to handle more complex scenarios and capture breathtaking footage.
Safety First: Mitigating Risks and Building Spatial Awareness
One of the most challenging aspects of how to fly a drone is developing accurate spatial awareness—understanding where your drone is in three-dimensional space relative to yourself and its surroundings. The video rightly points out that objects can appear closer or further away on your screen than they are in reality. This perceptual challenge, combined with environmental factors, necessitates a strong focus on safety.
Improving Spatial Awareness
- Practice Visual Line of Sight (VLOS): Always keep your drone within your visual line of sight. This is a fundamental rule in most drone regulations and helps you mentally map the drone’s position, especially if you momentarily lose the screen feed.
- Use Visual Cues: Pay attention to the drone’s orientation lights, its shadow, and surrounding landmarks to gauge its distance and direction.
- Understand the Screen Display: Learn to interpret the telemetry data on your controller’s screen, such as altitude, distance from home, and speed. These numbers provide concrete data to supplement your visual perception.
- Progress Gradually: Don’t attempt complex maneuvers or fly far away until you are entirely comfortable with the basic controls and your ability to judge distances.
Environmental and Operational Considerations
- Wind: Even moderate winds can significantly impact a drone’s stability and battery life. Always check wind forecasts. Flying against strong winds consumes more power and makes control more challenging.
- Obstacle Avoidance Systems: While many modern drones feature obstacle avoidance sensors, these are not infallible. They have limitations regarding speed, lighting conditions, and the size/type of objects they can detect. Never rely solely on these systems; maintain situational awareness.
- Interference: Areas with high electromagnetic interference (e.g., near power lines, cell towers) can affect GPS accuracy and control signal reliability. Avoid these locations.
- Emergency Procedures: Know what to do in an emergency: how to manually land if RTH isn’t an option, how to force a landing, or what to do if a propeller fails (though rare).
Legal and Ethical Responsibilities
Flying a drone comes with legal and ethical responsibilities. Understanding these is as important as knowing how to fly a drone:
- Local Regulations: Research and adhere to local, state, and national drone laws. These can include restrictions on flight altitude, proximity to airports, privacy concerns, and requirements for recreational or commercial licensing.
- Privacy: Be mindful of people’s privacy. Avoid flying over private property without permission or recording individuals without their consent.
- Wildlife and Environment: Do not disturb wildlife or sensitive natural areas.
By integrating these safety practices into your routine, you ensure not only the longevity of your drone but also the safety of those around you and the responsible use of airspace.
From Beginner to Cinematic: Advanced Control Techniques
Once you’ve mastered the individual controls and practiced the basic flight maneuvers, you’ll naturally begin to combine them. This synergistic use of joysticks and gimbal is what elevates basic flight into cinematic artistry.
- Smooth Starts and Stops: Abrupt changes in speed or direction make footage look amateurish. Practice feathering your joystick inputs to initiate and conclude movements gracefully.
- Coordinated Turns: Instead of just yawing, try a coordinated turn where you combine yaw (left joystick left/right) with a slight roll (right joystick left/right) and potentially some forward pitch (right joystick forward). This creates a more natural, aircraft-like turn.
- Tracking Shots with Pan: Fly forward (right joystick) while simultaneously rotating the drone (left joystick) to keep a moving subject centered in the frame. Add a slight gimbal tilt (jog wheel) for dynamic upward or downward reveal shots.
- “Drone Jib” Shots: Combine a slow forward movement with a slow gimbal tilt upwards to mimic a camera crane (jib) effect, revealing a landscape or structure.
The journey of learning how to fly a drone is continuous. Each flight offers new insights and opportunities to refine your technique. Embrace the learning process, experiment with different maneuvers, and always prioritize safety and responsible piloting.
Lift Off: Common Drone Queries
What do the two main joysticks on a drone controller do?
The left joystick controls the drone’s altitude (up/down) and yaw (rotation), while the right joystick moves the drone forward, backward, and sideways (strafe).
What is the drone’s gimbal and how do you control it?
The gimbal is a stabilizer that holds your drone’s camera, ensuring smooth footage by isolating it from drone movements. You typically control its tilt (up and down) using a jog wheel on the controller.
What is the ‘Return-to-Home’ (RTH) feature and why is it useful?
Return-to-Home (RTH) is a safety feature that automatically guides your drone back to its take-off point using GPS. It’s very useful if you lose sight of your drone or if the battery gets low.
Why are different flight modes important when learning to fly a drone?
Different flight modes, like Cine or Normal, adjust the drone’s speed and responsiveness. Starting in a slower mode helps beginners learn controls more easily and achieve smoother flights.