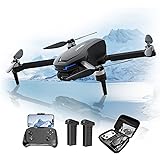
Approximately 3 million drones are expected to be sold annually in the coming years, with a significant portion going to first-time pilots. If you’ve recently joined this exciting community and are eager to embark on your aerial adventures, learning how to fly drones for beginners safely and effectively is paramount. The accompanying video provides an excellent visual guide to getting started, offering crucial tips to ensure your initial flights are smooth and, most importantly, crash-free. This article will build upon those fundamental principles, expanding on key concepts and providing additional insights to help you master the art of drone piloting from the ground up.
Essential Pre-Flight Preparations for Safe Drone Flying
Before your drone ever leaves the ground, a meticulous pre-flight routine is your best defense against potential mishaps. One key aspect involves ensuring you are flying legally and in a safe environment. Many new drone pilots overlook the regulatory landscape, but understanding local and national airspace restrictions is a non-negotiable step to prevent fines or even accidents.
Checking Flight Zones: Navigating Airspace Regulations
First, always check the legal flight zones in your area. Tools like Airmap, Before You Fly (B4UFLY), or the official apps from your local aviation authority (e.g., FAA in the US) provide real-time airspace information, highlighting restricted areas such as airports, military bases, national parks, and temporary flight restrictions (TFRs). Imagine if you unknowingly flew near a busy airport; the potential for a serious incident is alarming. These apps are indispensable for identifying no-fly zones and understanding any altitude limitations that might apply to your chosen location, ensuring your drone piloting activities are compliant.
Choosing Your First Flight Location: Wide Open Spaces
Second, select a large, unobstructed area for your initial flights. A wide-open field, a large park away from people, or a spacious rural area is ideal. Avoid locations with trees, power lines, buildings, or other structures that could pose a collision risk. While modern drones come with impressive obstacle avoidance systems, relying solely on them during your learning phase is risky, as they have their limitations. A clear environment allows you to focus purely on mastering the controls without the added stress of navigating tight spaces or immediate hazards.
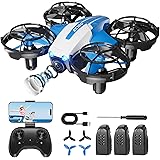
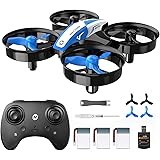
Decoding Your Drone Controller: The Basics of Flight
Understanding your drone’s controller is like learning the language of flight. Each stick and button serves a specific purpose, dictating how your drone maneuvers through the air. The video introduces the fundamental stick movements, which are crucial for any beginner drone pilot. Let’s delve deeper into these controls and other essential functions you’ll encounter.
The Left Stick: Altitude and Yaw
The left stick on most drone controllers primarily manages vertical movement (altitude) and rotation (yaw). Pushing the left stick forward makes the drone ascend, gaining height, while pulling it backward causes it to descend. To rotate your drone, push the left stick to the left to turn counter-clockwise, or to the right for a clockwise rotation. This rotation, known as yaw, allows you to orient the drone’s camera without changing its position, which is fundamental for capturing dynamic footage once you become more proficient.
The Right Stick: Directional Movement
Conversely, the right stick controls your drone’s horizontal movement in space. Pushing it forward makes the drone move forward, away from you. Pulling it backward brings the drone closer. Moving the right stick to the left or right will cause the drone to slide sideways in those respective directions. Mastering these basic movements individually forms the bedrock of fluid drone control, enabling you to position your drone precisely for photography or videography.
Beyond the Sticks: Essential Buttons and Functions
Modern drone controllers are equipped with several other important buttons. Many feature a ‘Pause’ button, which can bring your drone to an immediate stop and hover in place – a valuable panic button for beginners. The ‘Return to Home’ (RTH) button commands your drone to fly back to its take-off point and land automatically. While tempting to use frequently, it’s generally recommended to practice flying the drone back manually, as RTH settings can sometimes be misconfigured, leading to unexpected flight paths or even crashes. Additionally, many controllers include a record button to start/stop video recording and a gimbal control wheel, allowing you to tilt your drone’s camera up or down, which is essential for framing shots effectively.
Understanding Flight Modes for Beginner Drone Pilots
Your drone likely offers multiple flight modes, each designed for different levels of control and speed. Selecting the appropriate mode is crucial for building confidence and preventing accidents as you learn how to fly drones for beginners. The video mentions three primary modes; let’s explore their characteristics and ideal applications in more detail.
Cine/Tripod Mode: The Gentle Start
For your very first flights, or whenever you need incredibly smooth, cinematic footage, Cine mode (sometimes called Tripod mode) is your best friend. In this mode, all drone movements – ascent, descent, yaw, and directional travel – are significantly slowed down and softened. The drone’s response to your stick inputs will be deliberate and gentle, allowing you to make precise adjustments without sudden jerks. This is an excellent environment for new pilots to internalize the controls and develop muscle memory without the stress of rapid movements, minimizing the risk of losing control.
Normal Mode: Balanced Control with Safety
As you gain confidence with the basics, transitioning to Normal mode offers a more responsive flying experience while still maintaining important safety features. In Normal mode, the drone’s movements are faster than in Cine mode, making it suitable for general flying and covering ground more quickly. Crucially, most drones activate their obstacle avoidance systems in Normal mode, providing an extra layer of protection by automatically detecting and attempting to bypass obstacles. This balanced approach makes Normal mode a great everyday setting for intermediate flying, allowing for dynamic shots while still benefiting from integrated safety mechanisms.
Sport Mode: For the Experienced (with caveats)
Sport mode, or sometimes Ludicrous mode, unleashes your drone’s full speed and agility, allowing for rapid acceleration and high-speed maneuvers. However, this increased performance comes with a significant trade-off: in Sport mode, obstacle avoidance systems are typically disabled. This means the drone is entirely dependent on your piloting skill to avoid collisions, making it unsuitable for beginners. While exhilarating for experienced pilots attempting dynamic shots or racing, new users should absolutely avoid Sport mode until they have logged dozens of hours of practice and can fly instinctively in Normal mode.
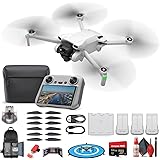
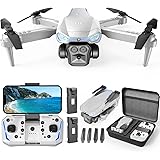
Preparing Your Drone for Its Maiden Voyage
Once you’ve familiarized yourself with the legalities, location, and controls, it’s time to get your drone physically ready for flight. Proper preparation ensures all systems are go and reduces the chance of mechanical issues or damage during take-off.
Unfolding and Gimbal Protection: Essential First Steps
Most modern consumer drones feature foldable arms, making them compact for transport. Before powering on, gently unfold all arms into their locked flight position, following your drone’s specific instructions. A critical step often overlooked by beginners is removing the gimbal cover. The gimbal is the delicate, motorized camera stabilization system; leaving the cover on can restrict its movement and potentially damage it when the drone powers up and performs its self-calibration. Always ensure the gimbal is free to move before turning on the drone.
Powering Up and System Checks
To power on your drone and controller, typically a double-press-and-hold sequence on the power button is required, confirming activation with an audible beep. After powering on the drone, allow it to complete its boot-up sequence and connect to your controller and mobile device app. The app will usually display vital information such as battery levels, GPS signal strength, and any system warnings. It’s imperative to wait for a strong GPS signal, indicated by a green icon or specific number of satellites, as this enables stable hovering and accurate Return to Home functionality, which are vital for flying drones for beginners with confidence.
Your First Flights: Building Essential Muscle Memory
The true learning begins when your drone lifts off the ground. The video expertly guides you through initial flight sequences, emphasizing the importance of repetition. Developing muscle memory is key to becoming a proficient pilot, transforming conscious effort into instinctive control.
Take-Off and Initial Maneuvers (Facing Away)
For your very first take-off, use a flat, stable surface rather than attempting a hand launch. This provides a secure platform and keeps your hands clear of the propellers. Once airborne, keep the drone facing away from you. In this orientation, the controls are intuitive: pushing the right stick forward makes the drone fly away from you, and pushing it left makes it go left from your perspective. Practice individual movements: ascend, descend, yaw left, yaw right, move forward, backward, left, and right. These single-axis movements, performed slowly and repeatedly, are crucial for internalizing how each stick input translates to drone movement, building foundational skills for effective drone piloting for beginners.
The Challenge of Flying Towards You
One of the biggest hurdles for new drone pilots is flying the drone when it’s facing towards them. The controls become reversed from your perspective, leading to potential disorientation. For example, pushing the right stick to the left will make the drone move right from your view. This requires a significant mental shift and intense concentration. The best way to overcome this challenge is through deliberate and slow practice. Begin with subtle, gentle movements, gradually increasing complexity as your brain re-maps the controls to the drone’s new orientation. This particular skill is a cornerstone for advanced maneuvers and navigating safely in varied environments.
The Power of Practice: Repetition is Key
Like learning any new skill, consistent practice is the secret to mastering drone flight. Don’t expect to be an expert after just one battery charge. Dedicate time to flying multiple batteries each session, focusing on specific movements and building your muscle memory. The goal is to reach a point where you react to the drone’s position and desired movement without having to consciously think about which stick to push or pull. Regular practice will make your movements smoother, more precise, and ultimately, safer, which is the ultimate goal when learning how to fly drones for beginners.
Capturing Stunning Footage: Camera Settings for Beginners
Beyond the thrill of flying, many drone owners aspire to capture breathtaking aerial photos and videos. While the technicalities of videography can seem daunting, there are simple approaches to getting great results right from the start. Understanding basic camera settings is a crucial step for producing quality drone footage.
Embracing Auto Mode: Your Go-To Setting (90% Rule)
For most beginner drone pilots, and even many experienced enthusiasts, the drone’s auto camera mode is incredibly capable. As highlighted in the video, auto mode can deliver excellent photos and videos in approximately 90% of situations, especially for casual use or sharing with friends and family. The drone’s internal processing handles exposure, white balance, and other settings, allowing you to focus entirely on piloting and framing your shots. Don’t feel pressured to dive into manual settings immediately; auto mode provides a fantastic starting point for capturing usable and enjoyable footage.
Diving into Manual Settings: The 2x Frame Rate Rule
When you’re ready to exert more creative control and produce more cinematic results, manual camera settings become invaluable. The “rule of thumb” for video is to set your shutter speed to approximately double your frame rate (e.g., if shooting at 30fps, aim for a 1/60th of a second shutter speed). This creates a natural motion blur that is pleasing to the eye. Additionally, keep your ISO as low as possible (e.g., ISO 100 or 200) to minimize digital noise, and set your white balance to match the ambient lighting conditions. For instance, a sunny day might call for 5500K-5600K, while a cloudy day could be in the 6400K-6600K range. These adjustments allow for greater control over the final look of your footage.
The Role of ND Filters
In bright conditions, achieving the desired shutter speed (double your frame rate) while maintaining a low ISO can be challenging without overexposing your footage. This is where Neutral Density (ND) filters come into play. Similar to sunglasses for your camera lens, ND filters reduce the amount of light entering the sensor, allowing you to use a slower shutter speed without overexposure. While the video suggests not worrying about them initially, understanding their purpose is crucial for aspiring aerial cinematographers aiming for professional-looking drone footage. Learning to incorporate ND filters is a common progression after mastering basic manual camera settings.
Safety First: Understanding Obstacle Avoidance and Smart Features
While mastering manual flight is paramount, modern drones also come equipped with advanced features designed to enhance safety and simplify complex maneuvers. Understanding how these work, and their limitations, is vital for every beginner drone pilot.
The Limits of Obstacle Avoidance
Many drones boast impressive obstacle avoidance systems that use sensors to detect objects and prevent collisions. However, it’s critical to understand that these systems are not foolproof. They can fail or miss certain obstacles, especially small branches, thin wires, or objects outside their sensor’s field of view (e.g., sideways movement on drones without 360-degree avoidance). Relying 100% on obstacle avoidance is a common mistake that can lead to crashes. Treat it as a helpful safety net, not a replacement for attentive, manual piloting. Learning to fly manually and maintaining visual line of sight with your drone will always be your most reliable safety measure.
Harnessing Smart Flight Modes
Beyond basic flight, drones offer smart features that automate specific flight paths, simplifying complex shots like orbiting a subject or tracking a moving target. These pre-programmed modes are fantastic tools for capturing dynamic, cinematic footage with relative ease, even for beginners. They can make your videos look incredibly professional and allow you to focus on the subject rather than intricate stick movements. Experimenting with these smart features can add significant value and creative possibilities to your drone piloting experience, making your journey with flying drones for beginners even more rewarding.