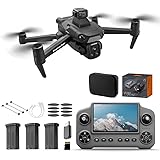
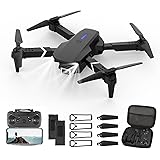
Imagine the excitement of unboxing a brand new drone, its sleek design promising endless aerial adventures. You power it on, grab the remote controller, and then… a moment of uncertainty. How do these two incredible pieces of technology speak to each other? That initial connection, the vital first step before any flight, is precisely what we’re exploring today. While the video above provides a concise visual demonstration of the electronic beeps and whirs signaling a successful pairing, this guide will delve much deeper into the ‘how’ and ‘why’ of making your drone and its remote controller understand each another.
Connecting your drone to its controller isn’t merely a technical formality; it’s like teaching two new friends a secret handshake. This crucial process establishes a secure, dedicated communication link between your flying machine and your control input device. Without this robust connection, your drone would simply be an unresponsive piece of hardware, unable to receive commands or relay telemetry data back to you. Understanding how to pair your drone with the remote controller properly is fundamental for safety, control, and maximizing your flying experience.
Understanding the Crucial First Step: Why Drone Pairing Matters
The act of pairing your drone with its remote controller is more significant than simply powering them on in proximity. It’s the moment they establish a unique, encrypted digital bond, preventing interference from other devices and ensuring your commands are only received by your specific drone. Think of it as tuning into a specific radio station; you want your controller to be on the exact same frequency as your drone, and only your drone. This dedicated channel is vital for maintaining precise control and preventing unexpected flyaways or loss of signal during flight operations.
Moreover, proper drone pairing is a fundamental safety measure. A stable connection ensures that emergency commands, such as returning home or engaging failsafe protocols, are always recognized and executed promptly. In contrast, an unstable or improperly paired connection could lead to unpredictable behavior, posing risks to property and even individuals below. Therefore, mastering how to successfully pair your drone with remote controller is not just about convenience; it is about responsible drone operation.
Deciphering the Dialogue: What Drone LED Lights and Beeps Tell You
Drones and their remote controllers often communicate their status through an array of blinking lights and distinct audio cues, much like a pilot relying on cockpit instruments. These indicators are crucial for understanding where you are in the pairing process and whether the connection has been successfully established. While the sounds in the video provide a general example, specific patterns and tones vary greatly between manufacturers and drone models, acting as a universal language for your drone’s operational state.
For instance, a rapidly flashing red light on the drone might indicate it’s searching for a controller, while a slower, pulsating blue light could signal that it’s in pairing mode. Upon successful connection, many drones will display a solid green or yellow light, often accompanied by a confirmatory beep or tone from both the drone and the remote controller. Recognizing these visual and auditory signals is indispensable for troubleshooting and verifying your drone’s readiness for flight. If you encounter unexpected patterns, consulting your drone’s specific manual will provide invaluable clarity.
Common Indicator Meanings
- Rapid Flashing (Drone): Often means the drone is actively searching for a remote controller or has lost signal.
- Slow Pulsating (Drone/Controller): Typically indicates that the device is in pairing or binding mode, waiting for a connection.
- Solid Light (Drone/Controller): A steady, non-blinking light usually confirms a successful connection and ready-to-fly status.
- Specific Beeps/Tones: Short, sharp beeps often signal mode changes or errors, whereas a sustained tone usually confirms pairing completion.
A Comprehensive Guide to Seamless Drone Pairing
Successfully performing the initial drone pairing can feel like a small victory for any new drone pilot. While the exact steps can differ slightly depending on your drone’s manufacturer and model, a general sequence of actions provides a reliable framework. Most modern drones are designed with user-friendliness in mind, simplifying this crucial setup. However, understanding the underlying principles makes the process much smoother and less intimidating for beginners.
The goal is to initiate a handshake between the two devices, allowing them to identify each other and establish a dedicated communication channel. This procedure needs to be performed only once, although re-pairing might be necessary after firmware updates or if you switch remote controllers. Prioritizing safety and following the manufacturer’s specific guidelines will ensure a robust and reliable connection every time.
Pre-Pairing Checklist
Before you even begin the pairing process, a few preparatory steps can prevent common frustrations. Ensure both your drone and remote controller are fully charged; a low battery can interrupt the binding process. Confirm that no other active drones or wireless devices are operating in the immediate vicinity, as this could cause signal interference during the critical pairing phase. Additionally, verify that any necessary companion apps are installed on your mobile device, as some drone models require app-assisted pairing, which adds another layer of security and functionality to the connection process.
The Standard Pairing Sequence
While specific steps vary, a typical drone pairing process generally follows this pattern. First, power on your drone and place it on a stable, flat surface away from any metal objects or strong electromagnetic fields. Next, power on your remote controller, ensuring it’s in close proximity to the drone, ideally within one to two meters. Then, simultaneously press and hold the binding buttons on both the drone and the remote controller until their respective LED indicators begin to flash, signaling they are in pairing mode. Once the lights turn solid, indicating a successful connection, you can release the buttons and proceed with pre-flight checks.
Exploring Diverse Pairing Methods for Your Drone
Not all drones connect in precisely the same way, much like how different car brands might have distinct key fob pairing methods. While the core principle of establishing a secure link remains constant, the execution can vary significantly across brands and models. Understanding these variations can save you considerable time and frustration, particularly when transitioning between different drone platforms. Some drones rely purely on physical buttons, while others leverage sophisticated mobile applications to facilitate the connection.
For example, some beginner-friendly drones may feature a single, clearly marked “bind” button on both the drone and the controller, simplifying the process for novices. However, more advanced professional drones often integrate the pairing function within a comprehensive flight control app, allowing for additional configuration and diagnostics during the connection phase. Knowing which method your specific drone employs is critical before attempting to pair it, preventing confusion and ensuring a successful initial setup. Always consult your drone’s user manual for the definitive steps.
Button-Based Pairing
Many entry-level and intermediate drones utilize a straightforward button-based pairing system. This method typically involves pressing a dedicated bind button on the drone, often located near the battery compartment or under a flap, and then simultaneously pressing a corresponding button on the remote controller. The devices then search for each other, and once a connection is made, their indicator lights will change from flashing to solid. This simple, tactile approach is often preferred for its ease of use and direct feedback, making it a popular choice for hobbyists who value a no-frills setup process before flight.
App-Assisted Connections
In contrast, many advanced and consumer-level drones from brands like DJI or Autel Robotics integrate their pairing process deeply within a proprietary mobile application. After powering on both the drone and its remote, users are prompted within the app to initiate the connection, often involving a QR code scan, a button press on the drone, or a direct Wi-Fi/Bluetooth connection. This app-assisted method offers several advantages, including guiding users with visual instructions, providing real-time status updates, and often performing initial firmware checks or calibrations immediately after pairing. This integrated approach ensures a more comprehensive and guided setup experience.
Troubleshooting Common Issues When Pairing Your Drone
Even with a clear understanding of the process, sometimes your drone just won’t seem to connect, leaving you wondering why your remote controller feels ignored. This common scenario can be incredibly frustrating, especially for eager new pilots. However, most pairing issues stem from a few identifiable problems, and with a systematic approach, they are often resolvable. Understanding these common roadblocks and their solutions is crucial for efficiently getting your drone airborne, transforming potential frustration into a successful flight.
Think of it like trying to connect to a new Wi-Fi network; sometimes the password is wrong, other times the signal is weak, or perhaps the router needs a reboot. Similarly, with drones, factors like signal interference, outdated software, or incorrect proximity settings can disrupt the vital communication link. Identifying these underlying causes is the first step toward finding an effective solution, ensuring you can quickly pair your drone with remote controller without excessive delays or unnecessary stress. Patience and methodical problem-solving are your best tools here.
Signal Interference and What to Do
One of the most frequent culprits behind failed drone pairing is signal interference. Just like trying to have a conversation in a noisy room, too many competing radio signals can prevent your drone and controller from hearing each other. Sources of interference can include other Wi-Fi networks, Bluetooth devices, power lines, and even large metal structures. If you’re experiencing difficulty, try moving to an open outdoor area away from these potential disruptors. Sometimes, simply relocating a few feet can dramatically improve signal clarity and allow the drone to pair successfully, demonstrating the importance of environmental awareness during setup.
Firmware Updates: The Often-Overlooked Solution
Many pilots don’t realize that outdated firmware on either their drone or remote controller can cause compatibility issues, preventing a successful pairing. Manufacturers frequently release updates to improve performance, add features, and, crucially, address connectivity bugs. Always ensure both your drone and controller are running the latest firmware versions; this is often done through the manufacturer’s companion app or software. Think of it as ensuring both devices speak the same updated language; trying to pair devices with different firmware versions is like attempting a conversation where one party is using an older dialect, potentially leading to misunderstandings or outright communication failures.
Range and Proximity Factors
While some drones have impressive operational ranges, the initial pairing process often requires close proximity between the drone and its remote controller. Attempting to pair them from across a large room or even from different rooms can prevent the low-power pairing signal from establishing a connection. Always keep the drone and controller within a meter or two of each other during the binding procedure. This ensures the strongest possible signal for that crucial first handshake. Additionally, some drones may have specific orientation requirements during pairing, so ensuring the drone is facing a particular direction relative to the controller can sometimes aid in establishing a stable link.
Essential Post-Pairing Checks for a Safe Flight
Once you’ve successfully completed the process to pair your drone with remote controller, the journey isn’t quite over; there are a few critical steps to ensure your drone is truly ready for its maiden flight. Much like a pilot performing a pre-flight checklist, these post-pairing actions confirm everything is in optimal working order. Skipping these vital checks could lead to unexpected behavior during flight, potentially endangering your drone or others. It’s about building confidence in your setup, confirming that the handshake between your drone and controller is robust and reliable.
Calibration and Setup
Immediately after pairing, most drones require a compass and possibly an IMU (Inertial Measurement Unit) calibration. This process helps the drone understand its orientation and position in space, preventing drift and ensuring stable flight. Follow the on-screen instructions in your drone’s app or the sequence outlined in the manual to perform these calibrations accurately. Think of it as giving your drone its bearings and internal gyroscope a proper baseline, ensuring it knows which way is up and how to interpret its movements. This crucial step directly impacts the drone’s stability and responsiveness, which are paramount for safe operation.
Maintaining a Strong Connection
After the initial pairing, it’s essential to understand factors that maintain a strong connection during flight. Always keep your remote controller pointed generally towards your drone, avoiding obstructions between the two devices. Be mindful of your flying environment; dense urban areas or locations with significant electromagnetic interference can weaken your signal, potentially leading to a loss of control. Regularly checking your drone’s app for signal strength indicators provides real-time feedback, allowing you to adjust your flying position or altitude to improve connectivity. A strong, consistent connection is the lifeline of your drone’s flight, safeguarding against unexpected disconnections.
Regular Connection Verification
Before every flight, even after a successful initial pairing, always perform a quick connection verification. Power on both the drone and controller, ensuring all indicator lights confirm a stable connection. Wiggle the control sticks lightly to confirm the drone responds appropriately to your inputs. This quick check verifies that the connection remains strong and that no new issues have arisen since your last flight. This consistent habit will provide peace of mind and significantly reduce the risk of unexpected incidents, ensuring your ability to pair your drone with remote controller consistently translates into safe and enjoyable flights.
Achieving Liftoff: Your Pairing & Connectivity Q&A
What does it mean to “pair” a drone with its remote controller?
Pairing means establishing a secure, dedicated communication link between your drone and its remote controller. This essential connection allows the controller to send commands and receive data from the drone.
Why is drone pairing an important step before I fly?
Proper pairing creates a unique digital bond that prevents interference and ensures your commands only go to your drone. This is crucial for maintaining precise control, maximizing safety, and preventing unexpected behavior during flight.
How can I tell if my drone and controller have successfully paired?
After successful pairing, the indicator lights on both your drone and controller typically turn solid (often green or yellow). You might also hear a confirmatory beep or tone from both devices.
What are the basic steps to pair my drone with its controller?
First, power on both your drone and remote controller, keeping them within a couple of meters of each other. Then, usually, you’ll simultaneously press and hold specific binding buttons on both devices until their indicator lights become solid, signaling a successful connection.